Installation as Easy As:

Position Graphic in desired position on smooth clean wax free surface.  Tape if neccesary

Squeegee out from the center of the graphic towards the outside. Making sure not to trap any air.

Remove the mask and you're done.  Multi-Color jobs are already together.

Content on this page requires a newer version of Adobe Flash Player.

Get Adobe Flash player


Video on installing pinstripe and graphic kits.

BUY ONLINE RETAIL STORE

CREATE CUSTOM LETTERING ONLINE


Recommended Application Instructions


All surfaces are contaminated to some degree. To ensure good adhesion to any vehicle surface it is critical that you follow these recommended procedures in decontaminating and preparing the surface prior to any vinyl product installation. Note: A clean, lint free towel or cloth must be used between each of the cleaning steps.

Cleaning Procedures:

  • Remove heavy road grime or tar by using a solvent, such as acetone, zylene, or kerosene, on a clean, lint free towel. (Please note that repeated use of solvents may cause damage to painted surfaces. Prior to using any solvent, apply to an area on the vehicle to test for negative reaction.) 
  • When a silicone substance or residue is suspected, wash and rinse the contaminated area with liquid dish detergent and warm water. Then dry the surface with a clean, lint free towel or cloth.
  • After using the solvent and/or detergent wash, use a clean, lint-free towel or cloth. Finish up the cleaning process by wiping down the entire area with Isopropyl Alcohol. To avoid recontamination during the final cleaning step, wipe the surface in just one direction, using a clean, lint-free towel or cloth. 
Temperature Recommendations:
  • Universal Products recommends the temperature be between 60 and 80 degrees at the time of installation. We also discourage any installation when temperatures are above 90 degrees and below 50 degrees. Surface temperatures should be brought to within the 50 and 90 degree range before attempting installation. 
Application Procedures:
  • A squeegee should be used to install graphics and striping. Because vinyl is a pressure-sensitive product it is imperative to squeegee a second time after the premask is removed. After the premask is removed, a protective sleeve or towel should be placed over the squeegee to protect the striping and graphics.
  • Please note when removing premask/application tape, always pull it slowly and back onto itself at a 180-degree angle.
  • A sharp air release tool or pin should be used to pierce the outer edge of any remaining trapped air bubbles. Using a knife or blade to release the air will result in a cut rather than a puncture in the vinyl.
  • The cutting or trimming of any stripe or graphic should be done with the sharpest knife possible. Any openings, such as doors should be trimmed back away from edges at least 1/8 of an inch. (Please note when burying one stripe under another stripe such as in a pinstripe, you must overlap the bottom stripe with the top stripe by at least 1/4 of an inch). 

Step by Step Instructions


Tools required: masking tape, scissors, squeegee, lint-free cloth, ruler.

Application temperature should be above 50° F (13° C). If extremely cold, move to an enclosed area and allow the surface temperature to warm. If extremely hot, move to a shaded area.

Please refer to application instructions for specific temperature recommendations.

Step 1
Clean the surface with Lendex Cleaner or a few drops of grease-cutting liquid detergent in water (do not use a petroleum base cleaner). Rinse clean with fresh water then dry with a lint-free cloth. Wiping surface with alcohol will also help remove any contamination and enhance the adhesion process.

Please refer to application instructions for additional cleaning procedures.

Step 2
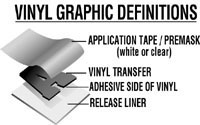
Put a piece of masking tape on each end of your vinyl transfer in the area where you plan to apply it and anchor each end to the application surface with masking tape.
Step 3
Estimate the center of your vinyl transfer and place two vertical lengths of masking tape to secure the vinyl transfer and create a center hinge as shown in the illustration. This step allows you to apply half of the vinyl transfer at a time.
Step 4
Remove the masking tape anchor from one end of your vinyl transfer and SLOWLY peel the release liner away towards the center masking hinge. Be careful not to touch the adhesive side of the vinyl transfer. Use scissors to cut away the excess release liner and discard.
Step 5
Hold your vinyl transfer by the application tape, careful not to touch the vinyl adhesive to the application surface until you are ready to squeegee. Beginning at the center hinge, make easy overlapping, pushing strokes with your squeegee. Remove the center hinge tape and slowly peel the remaining release liner away. Squeegee the other half of the vinyl transfer, working from the center to the edges.
Step 6
To remove the application tape, peel SLOWLY at a sharp (180°) angle. If the vinyl appears to be lifting, gently push the application tape in the opposite direction from which you were pulling and resqueegee that area. If after removing the application tape, air bubbles are apparent, puncture the vinyl with a pin or needle (DO NOT USE a knife or razor blade) and squeegee out the air towards the puncture.
 
Wet Application Method: Spraying Rapic-Tac onto your application surface will delay the adhesive activation between the bonding surface and vinyl transfer, resulting in a bubble-free, wrinkle-free application. CAUTION: Wet application may delay the immediate removal of the application tape. A waiting period of up to 30 minutes may be necessary.

 
Our Suppliers suggest we issue the following warning:
Why Surface Preparation is More Important 
Than Ever Before!

Due to an increased usage of silicone based additives in automotive paint that traditionally contained only solvents or oil derivatives, the pressure-sensitive graphics industry is facing adhesion problems. The result of these changes is the need for increased awareness towards cleaning and surface preparation methods.

To reduce the amount of solvents in some of the newer "heavy solids" paint and clearcoat products, silicone-based additives are used as flow agents. As the solvents evaporate during the curing process, silicone particles migrate to the surface, leaving a silicone residue. In fiberglass manufacturing, mold release agents may also leave a silicone residue.

Traditional surface preparation for graphics application has consisted of chemical washing. Most cleaners contain a hydroxyl compound (acetone, alcohol) or a petroleum base (kerosene, zylene) solvent. These solvents work by dissolving oil-based impurities that are on the surface.

Silicone, however, does not dissolve. Removal of siliconates occurs through emulsification (suspension of small globules within the liquid, like oil in water). Soap and water will generally outperform solvent for silicone emulsification. However, an extra wash process costs applicator time and it may not always be necessary.

Each application is unique. We need to be aware that the substrates and chemicals are evolving, and must compensate by adjusting our application processes.


SW900 Roll Film (Endura)
Use Recommendations Issued: 01/16/20'13
Graphic Storage and Rotation:

Product should be stored in a clean "office type" environment with year-around temperatures maintained between 65 and 85 degrees F.

Stock rotation practices should assure product use within one year from of date of purchase.
Pre-Application Cleaning Procedures:
• One should expect that all application surfaces are contaminated to some degree. Therefore, after cleaning the surface and prior to applying SW900 graphic materials, Universal Products recommends wiping the entire application surface with 70% Isopropyl Alcohol and then buffing the surface dry with a clean, lint-free cloth. Do no reuse the cloth -discard after a single use.
Application Recommendations:
• SW900 products should be applied when temperatures are between 60F and 90F. The dry application method must be used as application fluids will remain beneath the graphic and will negatively affect applied performance. Use ofthe wet application method when installing SW900 films will disqualify the product for anypotential warranty consideration.
Washing:

Pressure sensitive graphics require an extended period of time to reach ultimate adhesion values. It is recommended that pressure sensitive graphics not be commercially washed until ultimate adhesion has been achieved. The recommended wait periods are 72 hours in controlled conditions of rv75F, 1 week while outdoors during warm summer months (overnight lows at or above 60F) and 3 weeks during the cooler months (overnight lows below 60F).

Pressure sensitive graphics may be damaged by the brush mechanisms used in many commercial car wash systems. It is recommended that pressure sensitive graphics be spray washed or hand washed.

High-pressure sprays may cause the edge of the graphic to lift and peel away from the surface. Therefore, high-pressure spray nozzles should be held at a 90-degree angle to the vehicle surface, and atleast 2-3 feet awayfrom the graphic.

High pressure sprays with water pressures above 2500psi and/or temperatures above 120F should not be used on pressure sensitive graphic products.

Your graphics may be hand washed regularly with any commercial soap designed for use on automotive paint, or with most any commercial car wash soap. Thoroughly rinse the graphic surface with clear water following washing!
Cleaning:

Most road stains may be removed from the graphic by using isopropyl alcohol and/or soap and water.

Commercial cleaners specifically designed to remove road tar, etc, should always be tested on a small section of the graphic before being used.

Strong aromatic solvents such as acetone, MEK, toluene or paint thinners should not be usedto clean graphic surfaces as they may damage the vinyl and adhesive components of the graphic.

Following the use of any cleaning solution, the graphic should be thoroughly washed and then immediately rinsed with water.
Chemical Exposure:

Do not let solvents, gasoline or other chemicals drip or stay on graphic surfaces for any extended length of time.

If a spill occurs, wipe the surface clean and rinse with water immediately.
Waxing:

SW900 materials can be waxed using any high quality liquid wax designed for automotive finishes.

Do not hand-apply paste wax over graphic surfaces -especially if the wax contains abrasives or petroleum distillates. Wax build-up along the graphic edge can be unsightly, and may lead to premature graphic failure.
A comprehensive application instruction for SW900 film is located on the Avery Dennison website: www.na.averygraphics.comInstruction Bulletin# 4.08. All products are sold with the understanding that the purchaser has independently determined the suitability ofsuch products for its purposes.


Home